If you’ve just bought your first DSLR or mirrorless camera, the “Auto” mode is incredibly tempting. But letting the camera make all the decisions means giving up creative control over your images. Learning photography means, first and foremost, understanding and mastering light.
In this guide, the instructors at Daylight School break down the most important concept that every student encounters on the first day of class: the Exposure Triangle.
The Exposure Triangle: The Heart of Photography
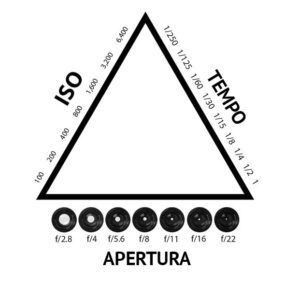
Every single photograph is the result of a balance between three physical and digital parameters. Changing one of them always requires compensating for the other two. Mastering this balance is the first step to shooting in “Manual” (M) mode.
1. The Aperture: Controlling Depth of Field
The aperture is a variable opening located inside the lens. It works exactly like the pupil of the human eye: it opens up to let in more light and closes when there is too much light.
It is measured in f/ values (e.g., f/1.8, f/5.6, f/11).
-
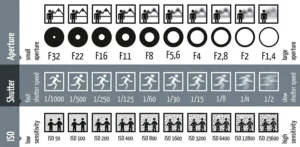
The technical rule: The lower the number (e.g., f/1.8), the wider the aperture. The higher the number (e.g., f/16), the narrower the aperture.
-
The Creative Effect (Depth of Field): A wide-open aperture (f/1.8) isolates the subject by blurring the background. This is the fundamental technique for portrait photography. A narrow aperture (f/11 or f/16) keeps everything in focus, from the foreground to infinity, and is the foundation of landscape and urban architecture photography.
2. Shutter Speed: Freezing or Capturing Motion
The shutter speed indicates how many fractions of a second the camera's shutter remains open, allowing light to strike the sensor.
It is measured in fractions of a second (e.g., 1/1000, 1/250, 1/60) or in whole seconds.
-
Fast shutter speeds (1/500 and faster): They freeze the action. Perfect for sports photography or for capturing a fast-moving subject without blur.
-
Slow shutter speeds (below 1/60): These capture the movement of the subject (blur) or of the camera itself (micro-shake).
-
Practical tip: To avoid blurry photos when shooting handheld, the general rule is to never go below the reciprocal of the focal length. If you're using a 50mm lens, your minimum safe shutter speed for handheld shooting should be 1/50 of a second.
3. ISO Sensitivity: Signal Amplification
ISO measures the sensor's sensitivity to light. It's the setting that comes to your rescue when the aperture is already wide open and the shutter speed can't be lowered any further.
-
Low ISO (100–200): Ensures maximum image clarity, zero digital noise, and the best color reproduction. Ideal for outdoor shots during the day or studio shots with flash.
-
High ISO (1600–6400+): These settings allow you to take photos at night or in dark environments without using the flash.
-
The technical trade-off: Increasing the ISO amplifies the light signal electronically, but this generates “noise” (that digital grain that causes the image to lose sharpness). The technical goal is to always use the lowest possible ISO for the scene you’re shooting.
Moving from Theory to Practice
Understanding how aperture, shutter speed, and ISO interact on a screen or in a manual is just the beginning. True technical skill is built in the field, by getting the exposure wrong, correcting it, and training your eye to read the available light.
If you want to turn theory into instinct and learn how to use your camera in any lighting condition, the best way to do so is with the guidance of professionals.
Check out our Basic Photography Course to start your training journey in Rome with Daylight School. We'll teach you how to turn off automatic mode for good.